How to Use will-change Property With Its Full Superpower ⚡
Learn how to use "will-change" property wisely to make sure you get the best out of it, while avoiding the harm that can come from misusing it.
Table of contents
will-change is a CSS property commonly misunderstood or not used correctly. You may have heard about or seen the will-change property on a Youtube video, or a course, or a blog post or anywhere, where they just added it the style sheet and say that it's a property used to improve and boost your web application performance, (That happend to me too by the way 🙂). So I guess that most of you (So did I 🙄😅) said: Okay! let's just add this property to everything and everywhere so we'll have the best performance. But actually, this is a very bad idea, and this is the part where most developers err.
In this blog post we're going to demystify this property and explain how does it work, and what's really happening behind the scene when setting it up, and also the do’s and the don’ts when using it. So, after reading this blog post you will be able to benefit of the superpower of will-change property from one hand, and to avoid the harmful effect of overusing it from the other hand.
How Does will-change Work?
The will-change property allows you to inform the browser ahead of time of what kinds of changes you are likely to make to an element, so that it can set up the appropriate optimizations before they’re needed. These kinds of optimizations can increase the responsiveness of a page by doing potentially expensive work before they are actually required. The elements can be changed and rendered faster, and the page will be able to update snappily, resulting in a smoother experience.
Behind The Scene:
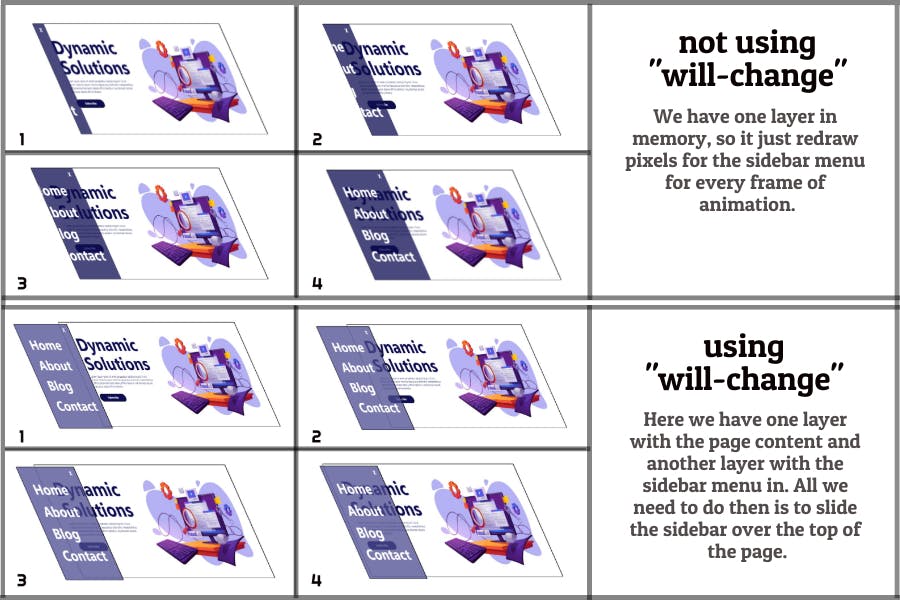
To properly understand the will-change property, let take a look on what happens behind the scene. Adding a will-change property to an element will actually promote that element to its own compositor layer (Compositing is where the painted parts of the page are put together for displaying on screen).

In this example 👆, we've applied will-change property to the sidebar menu, so it will be promoted to its own layer.
This isolates the rendering of the content so that the rest of the page doesn’t have to be rerendered if the element with the will-change property is the only thing that changes between frames, and often provides significant speed benefits.
The benefit of this approach is that the elements that are regularly repainted, or moving on screen, can be handled without affecting other elements. This is the same as with design packages like Photoshop, Sketch, or GIMP, where individual layers can be handled and composited on top of each other to create the final image.
Managing Layers:
If your website starts looking laggy and slow, you're mostly hitting a paint issue, so you might want to think about promoting an element to its own layer, and you may be wondering how do I create a layer? Well, before getting to that, you should see if an element already has its own layer.
Note: In this blog post I'm using Google Chrome DevTools. For other browsers, you might be able to follow the same steps, otherwise you can do a quick search, and you'll find the right way to do it.
To see the layers division on a website, go to the DevTools, then go to the rendering panel, you'll see a list of options, switch on the Layers borders. When it's switched on, the page will show you a grid.
- The light blue lines represent the tiles that each layer is split into. As developers, there is nothing we can do about that, it's just how the browser chose to split up the layer.
- But the interesting ones are the orange boxes, the orange boxes are elements that are on their own composited layer.
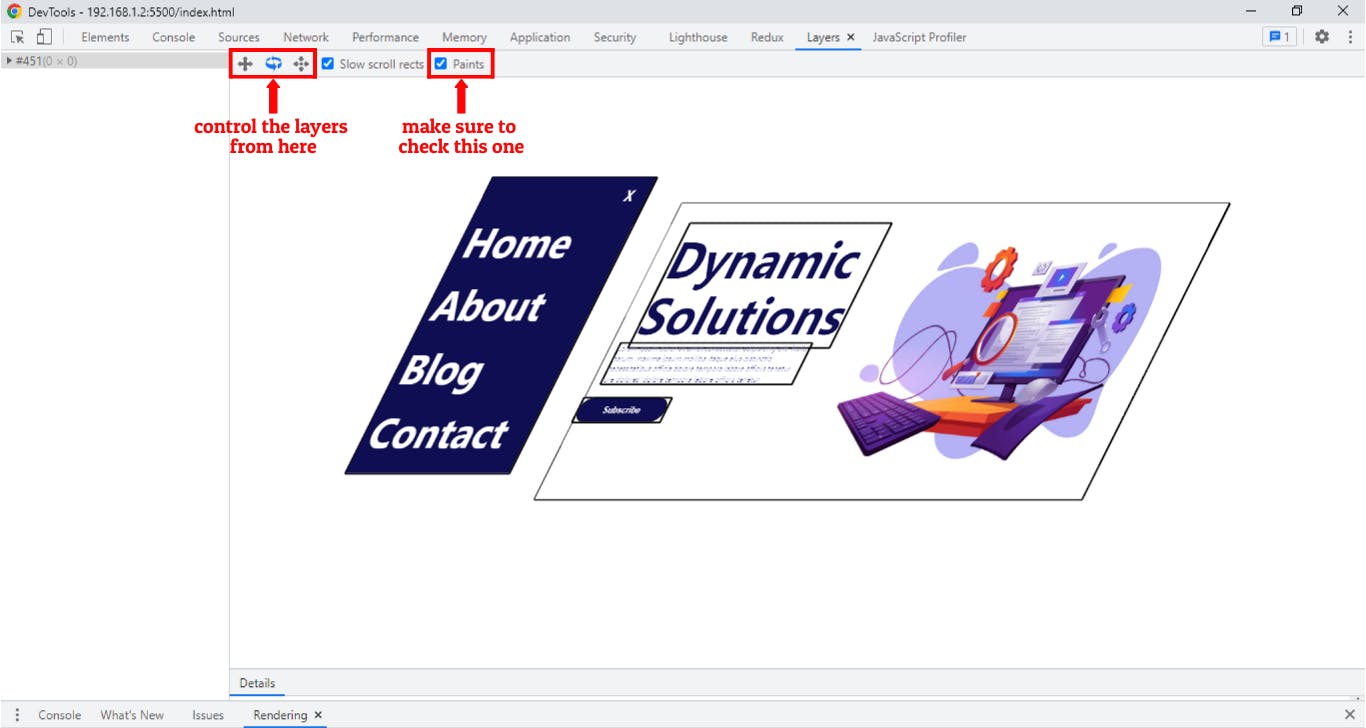
Another way to inspect the layers of the page with more clarity and control, always in DevTools, look for the Layers panel, open it, and voilà!

If the Layers panel is not visible for you, click on the three dots on the top right of the DevTools window, then click on More tools, a list of tools will pop up, Layers tool should be there.
How to Create a Layer:
Using will-change, promoting an element to its own layer and informing the browser about an upcoming transformation can be as simple as adding this rule to the element that you’re expecting to be transformed:
.element {
  will-change: transform;
}
This will hint to the browser about the changes some time before they actually happen. That way, it will have some time to prepare for these changes, so that when these changes occur, the element’s layer will be ready and the transform animation can be performed and then the element can be rendered and the page updated in quickly.
The Old: The translateZ() (or translate3d()) Hack:
For quite some time now, we’ve been using what has been known as the translateZ() (or translate3d()) hack (sometimes also called the null transform hack) to trick the browser into creating a layer to our animated element.
{
   transform: translateZ(0);
   // or
   transform: translate3d(0, 0, 0);
}
This old hacky way to promote an element to its own layer is rarely used, because all modern browsers support
will-change. In the end of this article you'll find a table indicating the browser compatibility for thewill-changeproperty.
Using will-change Wisely:
The will-change property should be used wisely, otherwise it will end up resulting in performance hits that could actually crash your page.
As with any performance hints, will-change has its side effects that aren’t directly detectable (after all, it is just a way to talk to the browser behind the scenes), so it may be tricky to use. Here are some things to keep in mind when you use this property, to make sure you get the best out of it while avoiding the harm that can come from misusing it.
Don't Apply will-change to Too Many Elements:
Knowing the power of will-change might be very tempting to just tell the browser to optimize for the changes that may occur to all properties on all elements, so many of you may think that all they have to do is writing this rule in their style sheet:
* {
   will-change: transform;
}
At first sight, this might look good, but in fact this is wrong and very harmful for the browser. The browser already tries as hard as it can to optimize everything, and doing this has the capacity to do a lot of damage, because some of the stronger optimizations that are likely to be tied to will-change end up using a lot of a machine’s resources, and when overused like this can cause the page to slow down or even crash.
The more layers you have, the more time will be spent in layer managment and compositing. So there's a tradeoff between reducing paint time, and increasing layer managment time.
Give The Browser Enough Time to Work:
The will-change property is named like that for an obvious reason: informing the browser about changes that will occur, not changes that are occuring. Using will-change, we’re asking the browser to make certain optimizations for the changes we’re declaring, and in order for that to happen, the browser needs some time to actually make these optimizations, so that when the changes occur, the optimizations can be applied without any delays.
Setting will-change on an element immediately before it changes has little to no effect. (It might actually be worse than not setting it at all. You could incur the cost of a new layer when what you’re animating wouldn’t have previously qualified for a new layer!) For example, if a change is going to happen on hover, then this:
.element:hover {
    will-change: transform;
    transition: transform 2s;
    transform: rotate(30deg) scale(1.5);
}
…tells the browser to make optimizations for a change that is already taking place, and that’s useless and kind of negates the whole concept behind will-change. Instead, you should find a way to predict at least slightly ahead of time that something will change, and set will-change then.
For example, if an element will change when it is clicked, then setting up will-change when that element is hovered gives the browser enough time to optimize for that change. Because human reaction time is relatively slow, so this will give the browser at least 200ms time window before the change actually happens, and this is enough for it to set up the optimizations.
.element {
    transition: transform 1s ease-out;
}
.element:hover {
    will-change: transform;
}
.element:active {
    transform: translateX(50px);
}
Setting up the will-change property on hover will be beneficial only if the changes are expected on a click event, otherwise the rule above will be useless if the effect is going to happen on hover. In cases like these, it is often still possible to find some way to predict the action before it occurs. For example, hovering a parent of the changing element may give enough lead time:
.element {
    transition: transform 1s ease-out;
}
/* Declare upcoming changes to element when hovering parent */
.parent:hover .element {
    will-change: transform;
}
/* Apply changes when element is hovered */
.element:hover {
    transform: translateX(50px);
}
Remove will-change After The Changes Are Done:
As we mentioned earlier, the optimization made by the browser for the upcoming changes are usually expensive, and can consume much of the machine’s resources. The usual browser behavior for optimizations that it makes is to remove them and revert back to normal behavior as soon as it can. However, will-change overrides this behavior and maintain the optimizations for much longer than the browser would otherwise do.
So we should remove will-change after the element is done changing, so the browser can get rid of a heavy weight.
Since it's not possible to remove will-change if it is declared in the CSS, it's recommanded that you set and unset it using JavaScript. So, returning to the previous example where we set will-change in the style rules, in JavaScript we would set up will-change on hover using mouseenter event, and then we use the animationEnd DOM event to detect the end of animation, so we will remove the will-change then.
// Get the element that is expected to change
var el = document.getElementById('element');

// Set will-change when the element is hovered
el.addEventListener('mouseenter', function() {
    this.style.willChange = 'transform';
});

// Unset will-change once the animation's ended
el.addEventListener('animationEnd', function() {
    this.style.willChange = 'auto';
});
Use will-change Sparingly in Style Sheets:
As mentioned in the previous section, it is recommanded to set and unset will-change in the JavaScript, to hint the browser that an element is always a few moments away from changing. But, what if our targeted element is expected to be interacted by the user over and over again, in similiar situations setting will-change in the style sheet (and keeping it) is more appropriate.
For example, transforming a sidebar by sliding it out when the user requests it. The following rule would be appropriate:
.sidebar {
    will-change: transform;
}
Another example is using will-change on an element that changes nearly constantly, like an element that responds to the user’s mouse movement and is moved around the screen as the mouse moves:
.follow-mouse-movement {
    will-change: left, top;
}
Do Not Use will-change to Anticipate Performance Problems:
If your page is performing well, don't add the will-change property to elements just to wring out a little more speed. will-change is intended to be used as something of a last resort, in order to try to deal with existing performance problems. It should not be used to premature performance optimization.
The will-change property has no direct effect on the element it is applied to, it is simply a rendering hint to the browser allowing it to set up optimizations for the changes that will occur to that element. It has no direct effect on an element beyond the creation of stacking contexts and containing blocks in some situations with specific properties.
Excessive use of will-change will result in excessive memory use and will cause more complex rendering to occur as the browser attempts to prepare for the possible change. This will lead to worse performance.
will-change Property Possible Values:
The will-change property takes one of four possible values: auto, scroll-position, contents, and <custom-ident>.
The value
autoindicates no particular intent, meaning that the browser will not set up any special optimizations other than the ones it normally does.The
scroll-positionvalue indicates, as the name suggests, that you expect to change an element’s scroll position any time in the near future.The
contentsvalue indicates that the element’s content is expected to change. Browsers usually cache rendering of elements over time, because most things don’t change very often, or only change their position. This value will be read by the browser as a signal to do less caching on the element, or avoid caching on the element altogether.The
<custom-ident>value is used to specify the name(s) of one or more properties that you expect to change. The value excludes the keywordswill-change,none,unset,initial,inherit,all,auto,scroll-position, andcontents, in addition to the keywords normally excluded from<custom-ident>. Multiple properties are comma-separated. The following are examples of validwill-changedeclarations with specified property names:
{
   will-change: transform;
   will-change: opacity;
   will-change: top, left, bottom, right;
}
If the property given is a shorthand, it indicates the expectation for all the longhands the shorthand expands to. For example, setting will-change: background; is identical to setting will-change: background-image, background-position, ...; for all the properties that background expands into.
Browser Compatibility:
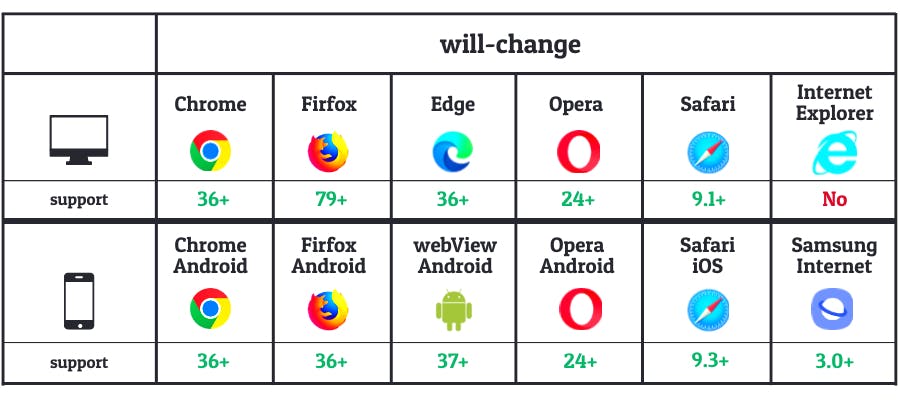
As you can see in the image below, will-change has full support by all modern browsers (Internet Explorer is excluded because it will be retired and go out of support on June 15, 2022).

Conclusion:
The will-change property is a great property that helps us optimizing and improving our application performance. But with great power comes great responsabilities, therefore will-change must be used carefully and wisly. So make sure you only use it when it makes sense.

